|
There are several types of adhesives that are commonly used to mount sensors:
1) Epoxies
This type adhesive is available in a variety of forms including liquid, pastes, films, tapes and powders, but are usually found in two parts which must be mixed before applying. Cure times vary between 5 minutes at room temperature to several hours at elevated temperatures. Most epoxies have fillers added to the basic resin which make them ideal to fill gaps or over coat sensors.
2) Cyanoacrylate Adhesives
These adhesives are of the “super quick set” variety. They cure at room temperature in 10 to 60 seconds. There are temperature and humidity restrictions for their use. Because most cyanoacrylates either do not contain fillers or have limited capability to fill voids, parts must be in close contact.
3) Silicone
Silicone adhesives have the advantage of being rubbery and provide a resilient low stress bond between sensor and surface. They are available in single or two part paste or even as a double sided tape which can be instantly applied to sensor and surface. They have a very wide useful temperature range. The paste type silicones require a long cure time and are subject to possible reversion if not cured above the required service temperature.
4) Polyimide Adhesives
There are several families of polymer adhesives which provide excellent adhesion and high temperature stability. However, they must be cured under carefully controlled temperature and pressure requirements. This makes field installation very difficult.
5) Ceramic Adhesives
Ceramic adhesives or cements have the advantage of having the highest useful temperature. They are used in paste form with metal oxides used as fillers with an acid used as the binder. They often require a cure at elevated temperatures. After curing, ceramic cements are generally hard, brittle and hygroscopic.
6) Solvent Release Adhesives
There are a number of commonly available inexpensive adhesives which require the release of a solvent from the resin material to form the bond. It should be noted that if the sensor is impervious to the solvent, the adhesive will not cure properly. Caution should be used in selecting these adhesives. After the adhesive has been selected a procedure must be developed which can be used to consistently mount the sensor. The following is a general guideline for a typical mounting procedure.
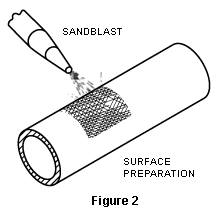 |
7) Surface Preparation (Figure 2)
One of the most important steps in mounting a surface sensor is the proper preparation of both the sensor and mounting surfaces.
Dirt, grit, oils, finger prints, etc. can act as a moldrelease, and affect the adhesion of the sensor to the surface. As a minimum, the sensor and surface should be solvent cleaned with a clean cloth wetted with alcohol, acetone, M MEK or toluol. Caution: some surfaces may be adversely affected by some solvents and a pretest of the solvent on the surface is recommended. In the case of metal or shiny hard surfaces roughening of the finish is usually required to insure a better bond. This can be done by roughening the surface with a light sandblasting or manually applied abrasive. Clean air should be used to remove grit after roughening is complete, followed by a solvent cleaning as described above.
8) Adhesive Preparation
After selecting the adhesive the manufacturers instructions should be carefully reviewed. Particular note should be made of mixing ratios, curing instructions and storage life. If there is a possibility that the manufacturers instructional limitations may be exceeded, the manufacturer should be consulted for his comments or recommendations. When developing the installation procedure the manufacturers limits or tolerances should be used.
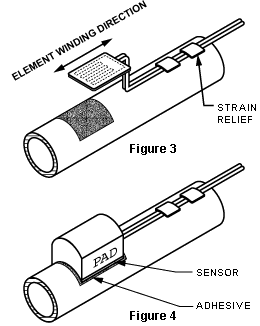 |
9) Installation (Figures 3 & 4)
The sensor first should be held in the area it is to be installed to check for any size or contour problems. A method for anchoring the leadwires to provide strain relief and thermal heatsinking should be determined. When all of the preinstallation preparation is complete, apply adhesive to both sensor and surface and push sensor into place to squeeze out excess adhesive.
A thin glue line will produce better temperature measurement results than a thick glue line. If a flexible sensor is mounted to a curved surface, the resistance winding should be transverse to the curvature to reduce strain effects.
Pressure should be applied to the sensor during the cure to assure that the entire sensor is bonded to the surface contour. Pressure can be applied using a rubber pad clamped over the sensor. The rubber's resiliency will provide equal pressure on the sensor. A mold release or Teflon® coating should be used on the pad to prevent the adhesive from bonding to the rubber.
10) Electrical Check
Once the adhesive is cured the clamps must be removed, insulation should be placed over the sensor and lead wires connected to instrumentation leads. At this point an electrical continuity test should be performed with a VOM.
If the sensor is a RTD an estimated resistance value can be found in the resistance versus temperature table. In the case of a thermocouple sensor, a voltmeter can be attached to the leads and by applying heat to the sensing area a signal will be generated that will confirm the integrity of the sensor and identify the polarity of the wires. When the mounting surface is electrically conductive a check to detect shorting between sensor and surface should be performed by checking continuity between surface and sensor leads. In the case of a grounded thermocouple this should be a dead short, for all other sensors this should be a minimum of 1 megohm on a VOM.
|